Xenoblade 3: Hidden values explained (Part 1: base game)
Table of Contents
This post illustrates some recent findings in Xenoblade 3 datamining.
Values are mostly taken from the newly researched devxml files. Information about those values is being collected over at this spreadsheet.
This coverage will be split in three parts: this post covers base game mechanics and unused content. I'll go over challenge battle and Future Redeemed content in future posts. (Part 2, Part 3)
Huge thanks to Lexicon (lexicon1) and Hamidu for helping with research.
Interlink
Interlink level
Interlink level points are exclusively gained through fusion arts.
Every fusion art grants 100 points if used by the controlled character or during auto-battle, or 150 points if used by the AI.
Points gained are boosted by 25% on Easy, and reduced by 25% on Hard.
When a character dies, the pair loses 500 points, but the Interlink level doesn't decrease.
- Interlink level 1: 400 points
- Interlink level 2: 900 points
- Interlink level 3: 1,500 points
Heat gauge
A full heat gauge is worth 1,000 points. I will refer to it using percentages for the rest of this section.
When Interlink is initiated, the combo timer on the targeted enemy is paused for 4 seconds if the Interlink has arts that would advance it, unless the combo stage is Daze or Burst.
If Interlink is started while the heat gauge is not empty (for example, by canceling and Interlinking again right away), a 10% heat penalty is applied.
Every second during Interlink, 4% heat is generated; outside of Interlink, 1.7% heat is dissipated.
When using an Ouroboros art, its Recast parameter is used to generate extra heat. In practice this is limited to Feather Sanctuary, which generates 5% heat at level 1, and all talent arts with 6%. Liberty Wing only overheats if there were incapacitated allies.
When canceling arts into arts, 3.6% heat is generated at base. If the "Heat Control: Arts Canceling" skill is active, this is reduced to 2.7%.
Curiously, canceling arts into arts as an Ouroboros will also add +0.4% to the Power Charge damage multiplier group for that attack.
The reason for this specific value is unknown, but the game checks that this is not zero to allow Ouroboros to cancel arts into arts.
There is an equivalent skill in Future Redeemed skill that also gives a 25% Power Charge boost (and, in fact, uses the same effect), though this has affected Ouroboros since 1.0.0.
When the gauge is 90% full and the Interlink level is 3, Noah's talent art will change to Origin Blade after a certain point in the story.
Interlink AI
When using auto-battle or with the Interlink control type setting set to "Player," Interlink will be controlled by the AI.
When a pair reaches a new Interlink level, the AI has a 0% chance to start the Interlink at lv. 1, 50% at lv. 2, and 100% at lv. 3.
The AI can also start an Interlink as a panic button: if a character goes below 14% HP and the current heat gauge for its pair is less than 55%, it will initiate Interlink to avoid death.
The AI will automatically cancel Interlink when the heat gauge is 85% full. This effectively means that if Interlink isn't started with Lucky Seven active, Noah's AI will never use Origin Blade at lv. 3, canceling before the 90% threshold.
Eclipse Soul
Eclipse Soul works somewhat differently between the two fights.
In both fights, the Eclipse Soul target will be picked randomly from the role with the most (alive) members. For Ouroboros forms, use Role from CHR_UroBody. In case of a tie, it follows Attacker > Defender > Healer.
When M is controlling a character, she will receive 100x the damage dealt to the controlled ally. This is intended for the second fight, but it can still be achieved in the first battle with e.g. spike effects. M will also take 99% less damage from incoming attacks while the effect is active.
Additional damage correction is applied to characters affected by Eclipse Soul:
- if the attacker has Eclipse Soul, damage dealt to party members is reduced by 50%.
- if a party member attacks the controlled character, damage is reduced by 99%.
- Technically this is "if target is an ally and attacker does not have Eclipse Soul". Curiously, this is why friendly-fire attacks have extremely low damage in setups that exploit the fusion AI glitch.
In the first fight, Eclipse Soul lasts 40 seconds.
In the rematch, Eclipse Soul lasts indefinitely, for a minimum of 5 seconds, and can only be halted by dealing 20,000 damage points to M. (either directly or via the controlled character as mentioned earlier)
AI
When there are more than 3 allies currently in an art animation, the party AI will only use arts that have FlagNoLimit set, that includes combo and healing arts for the most part.
Enemy AI will also refrain from using arts if there are more than 2 non-boss, non-unique enemies in an art animation. Unique and boss enemies will use arts regardless.
It is unclear why this limit was introduced, perhaps to limit noise, effects on screen, or for balancing reasons.
Enemy AI will also wait 3 seconds after the battle starts before performing any actions.
Enemy recharge
Some enemies get reduced recharge rate in multi-enemy battles if they are not being attacked, often by a significant amount:
ACC9E8FD in BTL_Enemy defines the minimum number of enemies (can be equal) to enable the reduced recharge rate, while 0893DF90 is the rate multiplier (%) itself.
This is only applied if the enemy is not being targeted by any player character, this cannot be guaranteed unless the Focus Target command is issued (ZL+Up). Without it, AI-controlled characters could pick a target of their choice, nullifying the effect.
This mechanic effectively results in enemies recharging arts faster when the enemy count drops below the threshold.
Arts canceling
The art cancel window is 15 frames, which is the same as the arts link (Chain/Shackle Ring) window.
If the AI has an art ready, it will attempt to use it during an auto-attack cancel window. The AI does not cancel arts into other arts.
When canceling, an extra auto-attack worth of recharge is given to equipped Agnus arts.
Accuracy
Considering $a, b \ge 0$ and $a, b \le 0.97$,
$$a = \frac{\text{Dexterity} \cdot (100\% + \text{Art Hit}) \cdot 0.75}{\text{Agility}}$$ $$b = a \cdot \text{Additives} \cdot \text{Preemptive}$$ $$\text{Hit Chance} = \max(\min(0.015, a), b)$$
where:
- $\text{Dexterity}$ is the attacker's Dexterity, $\text{Agility}$ is the defender's Agility.
- $\text{Art Hit}$ is
HitRevfromBTL_Arts_PCorBTL_Arts_En. - $\text{Additives}$ are the attacker's accuracy additives, minus the defender's evasion additives.
- $\text{Preemptive}$ is 1.5 if the attack was a preemptive hit (i.e. the defender has not noticed the attacker), or 1 otherwise.
The 97% hit chance cap was also present in Xenoblade 2.
Two notable accuracy additives are:
- +10% accuracy when attacking from the side,
- +25% accuracy when attacking from the back.
Elite enemies
Elite enemies have a set of stat boosts, and they are generally also given higher base stats compared to the rest of their species.
The boosts are as follows, I will also list the differences with Future Redeemed in this post:
- HP formula: $\text{HpMaxBase} \cdot (\frac{\text{StRevHp}}{100} \cdot a + b)$
HpMaxBaseis fromBTL_EnParamTable.StRevHpis fromBTL_Enemy.- $a$ is 1.5 in the base game, 1.25 in Future Redeemed. For non-elites, $a = 1$.
- $b$ is 1.5 in the base game, 0.25 in Future Redeemed. For non-elites, $b = 0$.
- Strength multiplier: 120% (125% in FR)
- Healing multiplier: 120% (150% in FR)
- Dexterity multiplier: 110% (125% in FR)
- Agility multiplier: 110% (125% in FR)
- EXP multiplier: 250%
- CP multiplier: 300%
- Gold multiplier: 350%
Helping/reviving allies
The revival speed formula (per second) is the following:
$$\text{Base} \cdot \text{Multiplier} \cdot \text{Gauntlet} \cdot \sum_{h \in \text{Helpers}}{\left( \frac{\Delta t_h}{30} \cdot \text{Additives}_h \right)}$$
where:
- $\text{Base}$ is $0.2$ for revivals, and $0.45$ for combo rescuing.
- $\text{Multiplier}$ is based on the number of allies currently helping:
- 1 helper: 100%
- 2 helpers: 130%
- 3 helpers: 160%
- 4 helpers: 180%
- 5 helpers: 200%
- 6 helpers: 220%
- $\text{Gauntlet}$ is the empty Nopwatch effect, 0.33 if the Nopwatch gauge is empty, 1 otherwise.
- $\Delta t_h$ is the time (in frames) helper $h$ spent rescuing since the last update. For a per-second formula, this ranges from 0 to 30.
- $\text{Additives}_h$ is the sum of helper $h$'s revival speed related additives (base = 100%). Revival speed additives also affect combo rescuing.
Alternatively, per frame:
$$\frac{1}{30} \cdot \text{Base} \cdot \text{Multiplier} \cdot \text{Gauntlet} \cdot \sum_{h \in \text{Helpers}}{\text{Additives}_h}$$
The final value is the gauge % to fill, which for combos is essentially a percentage of the total duration. This means that with a single helper and no additives, reviving an ally takes 5 seconds, and rescuing someone from a combo would take 67 frames if the combo did not also tick naturally in the meantime.
Revived allies are given back 15% of their max HP (at base, the gem effect is added to this value), as well as 3 seconds of invincibility.
Aggro target line
Aggro can be visualized with the target lines. There are actually two lines, one that is constantly shown, and an intermittent one that only comes up under specific conditions.
The main line signals the enemy's current target, and is colored blue if the target is a Defender.
When the next character with the most aggro has at least 70% of the current target's aggro, a quick intermittent line is displayed going to that other character every 3 seconds, signaling target is about to change. (This line is disabled for the first 4 seconds of battle.)
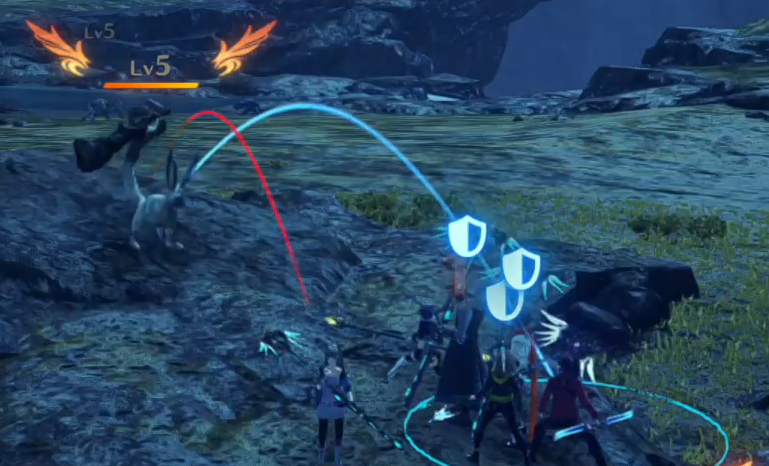
When this difference reaches 75%, the main line will start to wiggle (at an interval of 15 frames) until it either breaks on target change, or the difference drops below 70%.
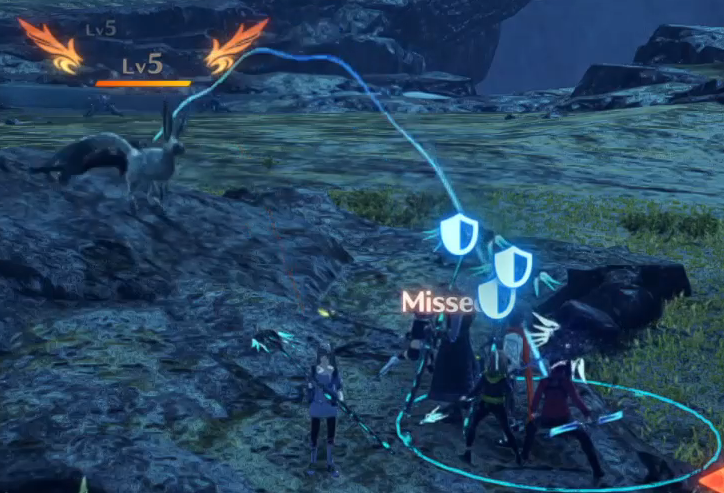
(Thanks Hamidu for the images!)
Combos
When Smash is inflicted on an enemy that has yet to activate Enrage, the Enrage max HP threshold (RageParam) is increased by 10.
Burst will clear Enrage, and pause the Enrage activation for 100% of the enemy's RageInterval (generally 1 minute).
For combo animation states that force the enemy to fall, certain enemies will only fall for 1.5 seconds before canceling both the state and the combo.
Attack range
When a unique or gauntlet enemy fails to attack for more than 10 seconds because it couldn't find or reach a target, it will enter a state that grants all of its attacks an attack range of 99,999.
This state lasts 5 minutes.
Ally distance teleport
The game employs countermeasures when allies get stuck and can't reach the enemy.
During battle, alive allies that are on the ground, and more than 20 meters above or below the party leader get teleported close to it. When the ally is dead, the threshold is reduced to 10 meters.
When engaging enemies, characters that are more than 4 meters above/below the party leader, or farther than 10 meters in 3D distance are also teleported.
If an ally can't move for more than 5 seconds, or can't perform an action for more than 15, it will get teleported to the party leader.
Similarly, if there is at least one ally alive that can revive, dead allies that go unrescued for more than 15 seconds (i.e. no one has started the revival action on them) get teleported to the party leader. This is disabled against bosses and unique enemies.
Unlocking classes
When an enemy is defeated, the party gains unlock points towards the equipped classes if they are not at maximum rank.
The exact value gained by each character is described by this formula:
$$\text{Enemy CP multiplier} \cdot \text{Overkill%} \cdot \text{Level modifier} \cdot \sum_{\substack{\text{character $c$} \\ \text{with same class}}} k_c$$
where:
- $k_c$ (for each character $c$ with the same class), is 100 if $c$ is a hero, 50 otherwise.
- $\text{Enemy CP multiplier}$ is the enemy's
ExpRate * RevExpTalent, essentially enemy CP divided by the base CPEnemyTalentExpfromBTL_Grow. This does not include food bonuses or the Elite CP boost. - $\text{Overkill%}$ is the chain attack overkill rate.
- $\text{Level modifier}$ is defined in this table (
TalentPointcolumns). Note that when a character is 6 or more levels higher than the enemy, they won't receive any unlock points.
Flame Clock
The Flame Clock mechanic for Colony 9 is active for the first two chapters of the game. The other colonies have fixed values and their gauge is just cosmetic.
A full gauge is worth 1,000 points, and it starts at 800 in a fresh file. For simplicity's sake, I will refer to 1,000 points as 100%, and so on.
There are two ways to fill or drain the Flame Clock gauge:
- Battling enemies
- Idling
When an enemy is defeated in battle, it will fill up the gauge by a
set amount
LifeFireNum in 152F4D70
, ranging from 0 to 3%.
When the party is wiped out, gives up or retries, you will lose 0.5% of the gauge.
Every 25 seconds, regardless of battle status, the Flame Clock gauge fluctuates depending on its current state.
To start, identify the starting state:
- If the gauge starts with less than 35% capacity: State 1.
- If the gauge starts at least 95% full: State 2.
- Otherwise: State 0.
Whether you lose or gain points depends on the current state:
- State 0: -0.1% gauge
- State 1: +0.1% gauge
- State 2: -0.4% gauge
After the fluctuation, the game tries to transition to the next state:
- If gauge > 95%: State 2.
- If gauge < 35%: State 1.
- If in State 2 and gauge < 80%: State 0.
- If in State 1 and gauge > 55%: State 0.
If the gauge is at less than 55% capacity, the party will get the "Flame Clock Low, Attack Down" debuff, which gives -25% additive damage.
This debuff mechanic is active since you get introduced to it in Colony 9, up until (and including) the Mysterious Enemy fight at the end of Chapter 1.
The gauge carries over to a New Game Plus file, so it is possible to start a playthrough with the maximum capacity, though the ability to fill up the gauge is lost at the start of Chapter 3.
Dirty clothes
The game has a mechanic that applies a dirt texture over characters' clothes after a while, encouraging the player to clean them.
Dirt can be controlled by the environment, or by event triggers.
- When on land, characters get 0.5% dirt every 34 meters they walk.
- While swimming, characters lose 5% dirt every 20 meters.
- When it's raining or thunderstorming (weather IDs 2, 3, 5), characters lose 5% dirt every 20 seconds.
(Note that only one of these can be active at once, weather has priority over the rest.)
In practice, the land dirt value isn't very significant. Several events apply or clear a more significant amount: for example, when you first get control of Glimmer in Future Redeemed she gets 75% dirt, and all dirt is cleared at the end of Chapter 1 in the base game.
You can also get rid of dirt at rest spots, though this works differently between the two games.
In the base game, clearing dirt at a rest spot will set the character's dirt level to 30%. Curiously, this is also the case when the character has less than 30% dirt, so the "cleaning" action would effectively make them dirtier in that case.
In Future Redeemed, this option clears dirt completely.
Unused content
Accuracy level difference modifier
The level difference modifier table has a column for attack accuracy. Data from this column is never used.
Pure revival speed gem
There exists data for a pure revival speed up effect next to other gem data.
The effect ranges from +20% to +45% revival speed, values identical to the "Fast Rescue & Healing Plus" gem that appears in the final game, suggesting that the former was scrapped in favor of this more general effect.
Interlink heat mechanics
A scrapped mechanic would make Ouroboros accrue heat upon taking damage.
The strength of the effect is unknown, but it is based on damage taken relative to max HP, and there is an unused skill that reduces it, similar to "Heat Control: Time".
Rage Strike
Rage Strike is a mechanic from Xenoblade 2 that is also present in the newest game, though it goes unused as it is exclusive to the unused Very Hard/Ultimate difficulty.
When an enemy enrages in the hardest difficulty, its next attack gains the following effects:
- Clears 22% of the chain gauge.
- +100% Power Charge damage multiplier.
Additionally, while the enemy is enraged, it gains a flat +50 resistance to all reactions, including those that are normally not resisted by enemies. There exists data for scrapped Topple, Launch, etc. Brooches that reduce resistance to those reactions specifically, though in the final version only the skill Fury Smash and Chain/Shackle Ring can reduce them.
Extra rage pause opportunities
Likely designed in tandem with the Rage Strike mechanic, the game also allows clearing and pausing Enrage by doing any of the following:
- Completing a chain attack.
- Using a talent art.
In the final version, those effects are disabled.